
 If you plan to integrate the custom search engine mentioned here, make sure to disable and remove the existing internal search option (if any), beforehand.
Another important consideration before going ahead is to make sure your website has no indexing issues. You can check it via Google Search Console.
Create a Custom Search Engine
Let's start the process! Head over to the Google Custom Search Engine homepage and click Create a custom search engine button.This'll take you to the search engine creation page, where you can provide the preliminary basic information to get started. An example of the same is shown below.
 The initial configuration is dead simple. First, provide the domain name of your website. If you're using the
 www prefix in your site's address, include that too—else omit it.Give a name to your search engine which—in most cases—is the site name though you're free to give it your preferred name. Finish with clicking the CREATE button. The next screen gives you two important options to choose from.
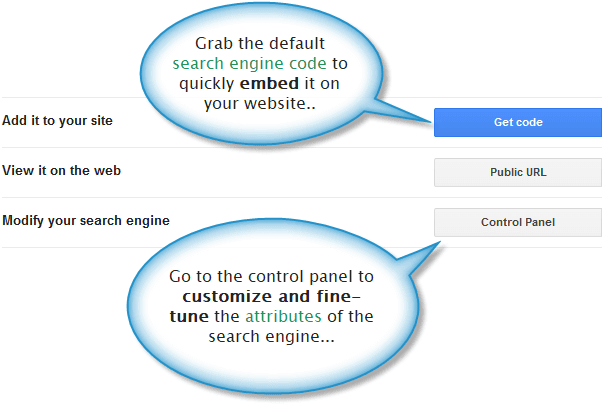 The first option is the default code one can use to instantly embed the custom search engine at the desired place on a website. The default code looks something like this.
<script>
  (function() {
    var cx = 'SEARCH_ENGINE_ID';
    var gcse = document.createElement('script');
    gcse.type = 'text/javascript';
    gcse.async = true;
    gcse.src = 'https://cse.google.com/cse.js?cx=' + cx;
    var s = document.getElementsByTagName('script')[0];
    s.parentNode.insertBefore(gcse, s);
  })();
</script>
<gcse:search></gcse:search>SEARCH_ENGINE_ID is replaced by the actual alphanumeric unique search engine ID when grabbing the code from the dashboard.You simply need to copy-paste this code at the right place within your website template to enable search box and its functionality. Make sure the section—for example, a sidebar widget—accepts HTML input where you're pasting this code snippet.
Customize Core Search Engine Attributes
Although the default state of the custom search engine is good enough for most websites, fine-tuning its attributes can give you—much better results.To get started, click on the search engine name to access its settings. This will open a multi-tab settings screen with the Basics tab already in an active state. On this tab, some of the important settings need to be tweaked. Let's take a look at them, one-by-one.
Image search results tab: In most cases, the web search results are what a visitor is looking for when triggering a query on the website's internal search engine.
 If you—as a website owner—think that an image search results tab is not needed at all, keep it in the default OFF state. A better strategy will be to keep it in an active state for a month or two to see the performance of the custom search engine.
Exclusion of pages from the results: Another powerful option available on the Basics tab is the ability to the exclude selective pages from the search results.
To exercise this option, go to the Sites to search section and click the Advanced link.
 Here, you can explicitly provide the URLs or the URL patterns which should be removed from the search results. For example, a site owner may want to exclude archive pages and select static pages from the search results.
To do so, click the Add button and provide the URLs you want to get excluded from the results. In the example shown above, I've used the following URL pattern.
www.freshtechtips.com/search/*www.yourdomain.com/tag/*
www.yourdomain.com/static-page/
forum.yourdomain.comforum subdomain.While using this option, take your time and make a list of content pages you want to get excluded from the result pages. Thereafter, use the power of this option to the fullest to block select parts of your website—when it comes to delivering search results to the visitors.
Custom search engine monetization: If you've already monetized your website, here's one more option to earn more revenue from your existing content pages. Yes, you've guessed it right!
 Website owners can quickly monetize their custom search engine through the Ads tab. Switch on the search engine monetization option within this tab—as shown above—to link your AdSense account with your internal search engine.
I'll strongly recommend activating this option because the adverts shown are contextually related and are unobtrusive.
The next two tabs Admin and Advanced can be safely ignored. The first one is used to add more administrators to manage the custom search engine. In most cases, it is not needed at all.
The second one can be used to customize the search engine through XML files. It is aimed for technically sound users and can be skipped altogether.
Change of layout and appearance: Next comes the tweaking of custom search engine's look and feel. To do that, click the Look and feel option which'll land you on the Layout tab.
Here you can select one of the layout options as shown below.
 The default Overlay layout displays the search results on the same page within a discardable overlay box. This may not be the best option for every website.
There are several other options—as indicated above—but the one I'll recommend is the Two page layout option. Through this option, the visitor is redirected to a new page to display the search results.
 On the Themes tab, one can select and activate a pre-made theme to instantly change the look-n-feel of the search results. The 3 themes I'll recommend are viz., Default, Minimalist, and Classic.
Do not forget to save the settings after choosing a new theme. And, the same old code works flawlessly with the new theme. There's no revised or updated code after the theme change.
 If a pre-made theme is not a good choice for your website and you want more control over the appearance, switch to the Customize tab.
Here, you can provide custom hexadecimal color values for different elements of the custom search engine. I'll strongly suggest avoiding choosing loud and dark colors. Keep the background white to get the best possible results. You can see a live preview of the customization—on the right side.
And lastly, make sure the thumbnail setting is switched on from its tab. It'll give you appealing search results for a higher click-through rate.
Tweaking of search features: Click the Search features link on the left side menu to access few more customization options. All of the tweaking options available through this link are not important.
If you want to announce a new exciting feature or a new important page on your website, go to the Promotions tab. Here, you can create a custom promotion that'll appear on top of the search results.
Make sure you've activated the Enable promotions setting. Thereafter, you can use the Add button to create a custom promotion.
 To add a promotion, all you need is a collection of few parameters viz., comma separated queries that may trigger promotion appearance, title, description, link to the promotion page, and an optional thumbnail image.
Note: Do not provide too many (catch-all) queries for the promotion. Be specific and be precise.
One must also provide the start and end date for the promotion. If you do not provide these dates, the promotion may run for an indefinite period.On the Autocomplete tab, make sure the feature is switched on—as shown below.
 Activating this feature ensures the visitor has to type less while looking for the desired information. It increases the probability of making the visitor to complete his search query.
The other 3 tabs can be skipped altogether leaving them in their default state.
Integration of Google Analytics: The Statistics and Logs menu link is yet another important destination to configure an important setting for the custom search engine.
Though the Stats tab provides ample analytical data about the search engine, an integration of the same with the Google Analytics account is highly recommended.
 Go to the Google Analytics tab and select the website profile where you're going to integrate the custom search engine.
Follow it with a click on the Add parameters option to provide up to 5 query parameters to be tracked within the Google Analytics dashboard.
 All the query parameters should be either a one alphabet or a one word (see image above) and must be separated by commas.
The Category parameters field is optional and can be safely ignored. Tracking of the parameters provided here is instant on the website where the search engine is integrated.
 And lastly, select one of your preferred query parameters through a radio button and click the Save button to finish the Google Analytics integration process.
This completes the custom search engine customization process that can be done directly from within the dashboard. Let's proceed to the next section to learn various—on-site integration—approaches.
Integrate the Custom Search Engine—Your Way
Now that you're familiar with all the important customization options of your custom search engine, it's time to take a look at some of the—popular and recommended ways—to integrate it with the website.The default implementation displays the results in an overlay box on the same page where the search box is embedded. We'll try two better approaches than this one.
Two-column layout: While using this approach, both the search box and the results are in different sections of the same web page.
For example, a typical implementation—using this approach—will put the search box in the sidebar and the search results will be displayed in a separate content section. An example is shown below.
 To use this layout option, insert the following code just before the
 </head> tag for all the pages where a search box or the search results will be displayed.<script>
(function() {
var cx = 'SEARCH_ENGINE_ID';
var gcse = document.createElement('script');
gcse.type = 'text/javascript';
gcse.async = true;
gcse.src = 'https://cse.google.com/cse.js?cx=' + cx;
var s = document.getElementsByTagName('script')[0];
s.parentNode.insertBefore(gcse, s);
})();
</script><div class="cse-box">
<gcse:searchbox></gcse:searchbox>
</div><div class="cse-results">
<gcse:searchresults></gcse:searchresults>
</div>Two-page layout: This second approach is quite different from the first one. You keep the search box on all the content pages of a website, but when it comes to delivering the search results—the visitors are redirected to a standalone page reserved specifically for the same.
 Here's how to implement it on your website. On the pages where you want to display the search box, use the following code snippet.
<script>
  (function() {
    var cx = 'SEARCH_ENGINE_ID';
    var gcse = document.createElement('script');
    gcse.type = 'text/javascript';
    gcse.async = true;
    gcse.src = 'https://cse.google.com/cse.js?cx=' + cx;
    var s = document.getElementsByTagName('script')[0];
    s.parentNode.insertBefore(gcse, s);
  })();
</script>
<gcse:searchbox-only resultsUrl="SEARCH_RESULTS_PAGE_URL"></gcse:searchbox-only>resultsUrl="" attribute used for the <gcse:searchbox-only> tag. Within the double quotes of this attribute, you have to provide the URL of the search results page where the visitors will be redirected after triggering the query.The next step is to paste the following code at the right place on the search results page.
<script>
(function() {
  var cx = 'SEARCH_ENGINE_ID';
  var gcse = document.createElement('script');
  gcse.type = 'text/javascript';
  gcse.async = true;
  gcse.src = 'https://cse.google.com/cse.js?cx=' + cx;
  var s = document.getElementsByTagName('script')[0];
  s.parentNode.insertBefore(gcse, s);
})();
</script>
<gcse:searchresults-only></gcse:searchresults-only>So, this completes the entire custom search engine integration guide. If you get stuck while using this guide, do not hesitate in contacting me—to resolve the issue.
