
Windows Subsystem for Linux (WSL) is one of the most-loved features developers use on a Windows machine. It gives you a fairly capable Linux environment. And, this feature is growing in capabilities by leaps and bounds. Now, it's possible to run native GUI applications from within WSL. But, some prerequisites must be met before you try the GUI apps. In this guide, we'll learn to run Google Chrome and Firefox Linux versions from within the Windows Subsystem for Linux. It'll help web developers better test their designs on both Linux and Windows environments. Let's get started.
I'm presuming you have prior experience with WSL and you've used it in the past. This tutorial is all about adding both web browsers to the WSL environment. I mean their native Linux binaries.
It's a two-step process. First, we'll ensure we're meeting all the prerequisites and then we'll go for the installation of both web browsers. It may be possible that you already meet the prerequisites.
Meeting the Prerequisites
So, let's start with fulfilling the prerequisites of running GUI apps through your WSL instance. First of all, you need a version of Windows 10 that shouldn't be older than the one specified below.
You need a Windows 10 Build 19044 or later to be able to run GUI apps on WSL.
To check your current Windows 10 build number, go to Settings → System → About → Windows specifications section. Here, look for the OS build entry.
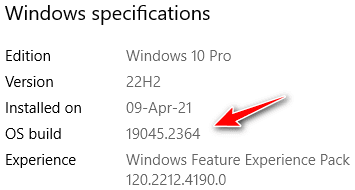
As you can see in the sample screenshot above, the OS build meets the requirements. In case, you have an older OS build, update your Windows 10 copy to fulfill this requirement.
To get the best possible performance, WSL uses hardware-accelerated OpenGL rendering. And, for that, you need a graphics driver that enables the WSL system to use a vGPU for graphics rendering.
Most people have Intel, AMD, or NVIDIA graphics cards on their Windows machines. The solution to this problem is dead simple.
Simply, install the latest driver for your graphics card and you're good to go. You can use driver installation assistant software to ease this process. Almost every graphics card company provides such software applications for the end users.
And lastly, you need to upgrade from WSL1 to WSL2. For this guide, I'm presuming you're already using WSL1 on your Windows machine. Here's how to upgrade to WSL2.
First, you need to install the kernel update package for the WSL2 system.
Thereafter, you need to set WSL2 as the default version whenever you intend to use the Windows Subsystem for Linux. To do that, open Powershell and use the following command.
wsl --set-default-version 2Now that you have installed and configured WSL2 as your default version, you need to make sure that the Linux distros you're using in your WSL environment use the newly upgraded WSL2 system.
To list all the Linux distros you're currently using, use the following command.
wsl --list --verboseAnd, you get the following output with some differences as I'm already using WSL2 on my Windows instance.

In your case, the VERSION will show 1 instead of two. If there are multiple distros installed on your system, those will be listed as well.
To upgrade your Linux distro from WSL1 to WSL2, use the following command.
wsl --set-version Ubuntu-20.04 2In my case, the Linux distro was Ubuntu-20.04. In your case, whatever is the distro's name, use that in the command.

Now open your WSL window, and fire the uname -a command. You can see (screenshot above) that your Linux instance is indeed running on the WSL2 version.
Installing Google Chrome in WSL2
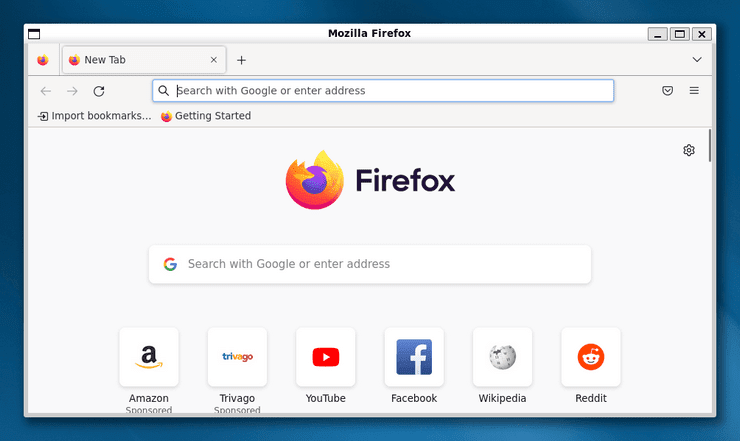
Now that all the prerequisites are met, let's move on to install both web browsers. First, we'll go with Google Chrome. You can see its screenshot below.

The blue background behind the Google Chrome window is the Windows 10 desktop. You can see that it runs as a standalone application and looks more or less like a typical Windows app.
Here's how to install it. First of all, switch to the temporary files directory through the cd /tmp command.
Thereafter, you need to download the browser's binary file. Use the following command.
sudo wget https://dl.google.com/linux/direct/google-chrome-stable_current_amd64.debInstall the downloaded package file through the dpkg command as shown below.
sudo dpkg -i google-chrome-stable_current_amd64.debAfter running this command, you may get some errors. To fix these errors, run the following command.
sudo apt install --fix-broken -yAnd lastly, rerun the dpkg command fired earlier.
sudo dpkg -i google-chrome-stable_current_amd64.debThis completes the Gooogle Chome installation. Now you can run the Google Chrome browser by using google-chrome command on the shell prompt. One can also run it from the start menu. You'll find it under the Linux distro name you're running in your WSL environment.
Installing Firefox in WSL2
There are several ways to install Firefox. I've chosen the two easiest ways. But, first of all, take a look at the screenshot below. It's the same as Google Chrome. Again, the blue background behind the window is my Windows 10 desktop.
To get started, use the following two commands in the order given below.
sudo apt update
sudo apt install snapd
If snapd is already installed, you can skip the second command. Thereafter, use the following command to install Firefox binary.
sudo snap install firefoxThere's one more way to install this web browser. Do not use the snapd commands, and instead use this one.
sudo apt install firefoxOnce installed, you can issue the firefox command on the shell prompt to open the Firefox web browser. Like Google Chrome, this one too has an entry in the Windows 10 start menu.
