
This tutorial is indented for website owners who're a bit savvy and are not afraid of diving into technical stuff. First of all, you don't need to be a software engineer to pull this off. In this guide, we'll learn to install WordPress on a virtual private server from scratch. We'll also learn to install the Let's Encrypt certificate for our website's domain name. I'll use a command-line tool to get the job done. It'll ease the entire process and will help even the technically challenged to complete this process in a few easy steps. So, let's get started and learn to install the Let's Encrypt enabled WordPress site on a custom VPS server.
This tutorial is for the VPS powered by Linux operating system. If you're using a Windows server, this guide does not apply to you. Ubuntu Linux is required for configuring this website setup.
If you're running a high-traffic website and want to transfer it over to this newly-installed site, make sure you've taken a backup before attempting the migration. Let's go and start this process!
Note: I'm using Digital Ocean for this tutorial, but you're free to use any VPS provider like Linode or Vultr. The interface may be different but the concepts are the same.
Start with creating your account and move towards creating a VPS instance for your website. Different hosting platforms call these VPS instances by different names. For example, Digital Ocean prefers to call it a Droplet which closely matches the brand name itself.
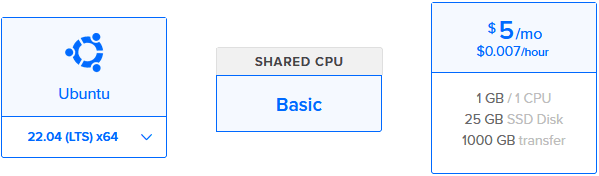
Because I'm using the demo VPS for this tutorial, I've chosen the basic one. Following is the configuration of our VPS.
- Ubuntu 22.04 LTS (64-bit)
- 1 shared CPU core
- 1 GB RAM
- 25 GB SSD disk space
- 1000 GB data transfer quota
If you're creating a brand new website with almost nil or low traffic, make sure your VPS instance has at least 2 GB RAM. And, in case you're website is already receiving decent traffic (at least 1000 unique visitors per day), go for a VPS having at least 4 GB RAM.
So, after instantiating our demo VPS, let's proceed to the next step of attaching a domain name to the VPS. In my case, I'll use a subdomain of this blog's domain name.
So, it'll be demo.freshtechtips.com which I'm now going to add to the VPS instance I've created.

To do that, I've selected the Add a domain option from the drop-down menu associated with my VPS instance.

Clicking that option will give me a text field, where I'll enter the domain name I need for my demo WordPress site. I'll finish the process by clicking the Add Domain button.

Now that we've added the domain name to the VPS instance, it's time to point this domain to our VPS server. To do that, first of all, copy the IP address of your VPS instance.

Open the domain management dashboard where you manage your domain name's DNS records. Add an A record with the following values.
In my case, a subdomain is being used, so the record will be as shown in the image above.
- Host: demo
- IP Address: IP address copied from the VPS instance
In your case, let's say the domain name is example.com. Then the A record will be:
- Host: @
- IP Address: IP address copied from your VPS instance
At this point, the VPS has been created, and the domain name is pointing to the VPS instance. But, still, no website has been installed and configured on the server. Let's do it!
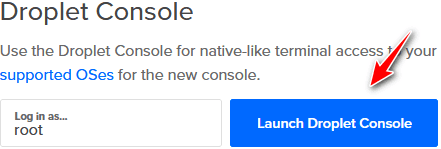
Start with opening the console window through the Launch Droplet Console button as shown in the image above. It'll give you access to the server shell with root privileges.
You may be wondering that now you may have to use dozens of complicated shell commands to install and configure the website. But, that's not the case. You only need two commands.
We'll use Easy Engine for the same. It's a powerful software to install different types of websites on the servers. The commands are easy to use and work like charm.
First of all, you need to install the Easy Engine software. Simply use the following command to do that.
wget -qO ee rt.cx/ee4 && sudo bash eeFiring this command will start the installation process. Following is a sample screenshot of the same.
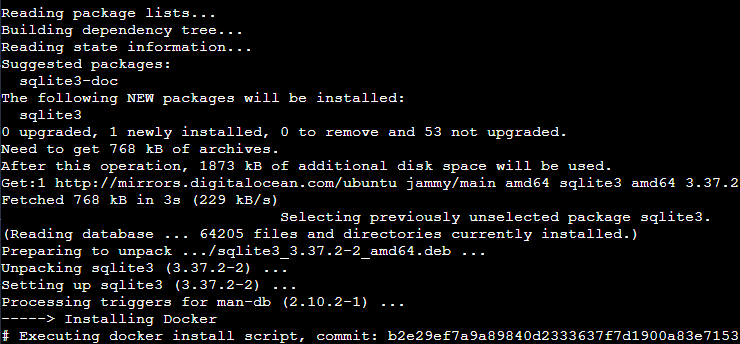
The entire installation process is automatic and non-interactive. Apart from giving the initial command, you don't have to do anything for the installation process to get completed.
The installation process may take a few minutes to get completed. So, please be patient while it finishes.
Now, that Easy Engine has been installed on the server, we'll use one of its commands to install and configure the Let's Encrypt enabled WordPress website. It'll be done with a single command.
We'll use the ee site create command for the same. It accepts several parameters. Let's see them one by one. If you don't need some of these parameters, you can skip them—selectively.
- --cache - (optional) If you want to use Redis cache for your WordPress site, use this option.
- --ssl=le - You must use this option if you want to use the free Let's Encrypt SSL certificate.
- --admin-user - (optional) Use this option to provide the username of the admin account for your WordPress site.
- --admin-pass - (optional) And, this one is used to provide the admin password.
- --admin-email - As you may have already guessed, this option is used to provide the admin email address.
- --type=wp - This is yet another mandatory option one must use to tell Easy Engine that we want a WordPress site.
- --locale=en_US - (optional) This option can be used to provide the locale for your WordPress site. For example, if you're residing in Germany, use the
--locale=de_DEoption. - --dbprefix=v9y_ - (optional) Though this option is not mandatory, I'll highly recommend using it to provide a custom database prefix for your WordPress site. It hardens the security of your WordPress website. In our example, I've used the
v9y_prefix.
And, here's what the entire command will look like with all the parameters.
ee site create demo.freshtechtips.com --cache --ssl=le --type=wp --locale=en_US --dbprefx=ti_ --admin-email=admin@example.com --admin-user=edmondsr --admin-pass=jgi@594tyYou can rearrange the parameters as per your preference, but make sure the domain name comes immediately after the ee site create command.
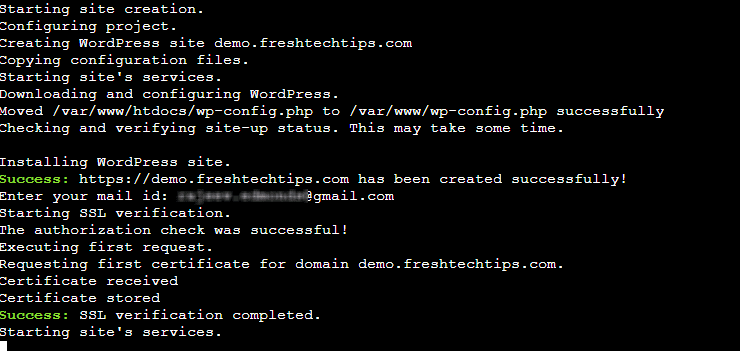
And, here's how the console screen may look as the command is executed. The installation process may take a couple of minutes to finish. During the installation, if it prompts for your email address, provide the one you're planning to use for your admin account.
Once the command's execution is complete, open your new WordPress site in the web browser. Type in the domain name you've used in the command and you'll see an SSL-enabled WordPress site homepage.
If you get stuck at any stage, feel free to leave a comment below for help.
