
 Pro Tip: The key to saving disk space is to keep only the essential apps on the system and to regularly clean the system.
Let's one by one check all the different ways to free up disk space on our PC.
#1 Use Classic Disk Cleanup Utility to Purge Unnecessary Files
This is one of the oldest and reliable methods to clean up junk and unnecessary files from a PC. Disk Cleanup utilitycleanmgr.exe is available on almost all of the popular Windows versions.To open this utility, press Windows + S and type Disk Cleanup in the search box. Select and click the utility option from the menu.
Initially, you'll be presented with a drive selection dialogue box. Through the drop-down menu, you can select the drive letter where you want to run this disk cleaning tool. In most cases, one should select the C: drive because that's where all the system and apps files are present.
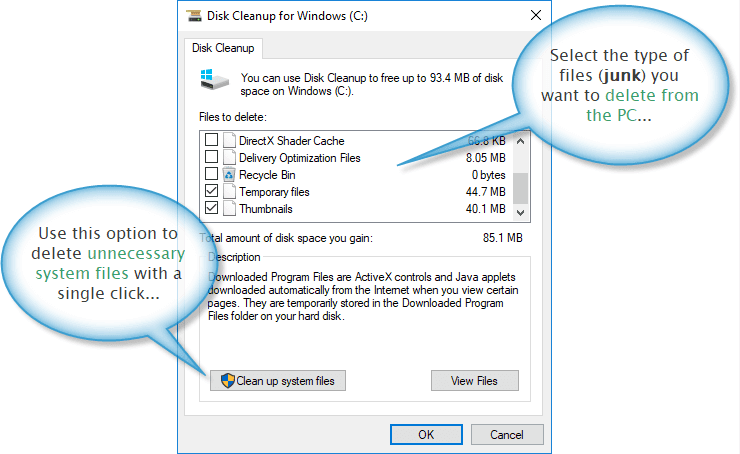 Upon drive selection, you'll get the file selection prompt as shown above. You can manually select the type of files to be deleted. Pay special attention to the size of junk for each file type and make sure to select the ones having medium to large junk size.
There's also an option to delete the system files. For this option too, you can select the file types to be deleted. After file type selection, click the OK button to start the cleanup process. Depending on the size of junk, the cleanup time can range from few minutes to more than half an hour.
#2 Configure Automatic Junk Deletion Through Windows Storage Sense
Windows 10 users can take advantage of the Storage Sense technology to automatically clean junk files from their systems. Just configure it once and forget about manual deletion exercise for unused and unnecessary data.To access this facility, go to Settings → System → Storage option. Here you'll find a lot of sub-options to monitor and manage hard drive space.
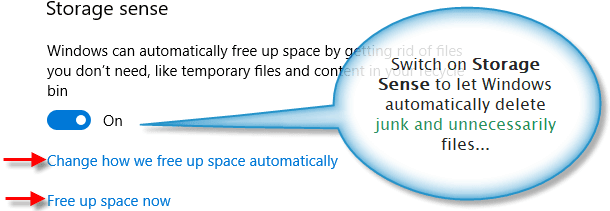 First of all, switch on the Storage Sense option (see image above) without any delay. You can find two more options indicated by the red arrows.
Use the Free up space now option to kick-start the cleaning process, without any delay. And in case, you want to customize how automatic deletion process should work, use the Change how we free up space automatically sub-option.
 On this sub-option page, you'll find several configuration controls. Here, select when should storage sense start the cleanup process. For best results, use the When windows decides option.
Tick the checkbox that enables automatic deletion of files installed apps are not using at all. One can select the trigger for both recycle bin and downloads folder data. Though default duration is good for most cases, one can increase or decrease the number of days as per his preferences.
Whenever this duration threshold will occur, Windows will automatically start the temporary files deletion process.
 Another important option on this page is how you manage the data associated with older Windows releases. This data gobbles up a huge amount of disk space, unnecessarily.
Upon successfully updating to the latest Windows 10 release, wait for a day or two to see if everything is working correctly or not. Thereafter, activate the Delete previous versions of Windows option.
Now, click the Clean now button to remove all the old Windows data and to reclaim the huge amount of disk space for general usage.
#3 Remove Applications You Rarely or Never Use
If you're running low on disk space, another useful option to get back the same is to uninstall those applications which either you never use or you open them rarely.If one of these applications is already occupying a large amount of space, you can benefit from this fact by removing such inactive and stagnant program.
The process of removing such applications starts with a quick audit of all the installed programs. This way, you can shortlist all the unnecessary applications and can create a list of the same. Thereafter, you can start the application removal process in one of the two ways mentioned below.
 To use the first method, press Windows + S key and type Control in the search box. Click the Control Panel app from the menu. Select the Programs and Features option to manage application removal as shown in the image above.
From the list of all the installed applications, one-by-one, remove all the unused apps by double-clicking on each such application's entry.
Use the shortlisted app list made earlier during the audit process to ease the uninstallation process and to avoid accidental removal of an important application.
 Windows 10 users can use another method to remove unnecessary applications from the system. To get started, go to Settings → Apps → Apps & features option.
Here too, you'll get a list of all the installed applications. All you have to do is to select the respective application followed by a click on the Uninstall button. Repeat it for all the unused applications.
#4 Configure and Manage System Restore Points to Reclaim Disk Space
System protection is yet another feature that can gobble up a lot of disk space on low capacity hard drives. When it is turned on, upon system and program updates, Windows automatically saves the system state in the form of a restore point.These restore points consume a lot of disk space. If something goes wrong and the system needs to be reverted to a previous stable state, restore points come handy.
Depending on the amount of disk space allocated for system protection, there can be several restore points on the hard drive taking a significant portion of a low capacity disk.
 To get back this space, press Windows + S key and type System Restore in the search box. Click Create a restore point option from the menu.
Here, click the Configure... button present on the System Protection tab. The first thing you can adjust is the total space allocated for the restore points. Use the Max Usage slider for the same.
If you're really running out of disk space, use the Delete button to purge all the existing restore points.
#5 Transfer Large Files to an External Hard Drive
If you're addicted to games, movies, and other types of space consuming applications, sooner or later, you're going to run out of space. This problem can aggravate if you do not want to delete these large files.Even compression of executable files doesn't help much. So, what's a permanent and reliable solution for the same?
 Yes, you've guessed it right. A portable external hard drive is the way to go. Depending on your requirement, decide on the drive capacity to make sure it can accommodate all the data.
If you're a frequent traveler, the drive's weight, its sturdiness, and a good case matter the most. For large data transfer, drive's read-write speed is an important deciding factor.
 WD 4TB Black My Passport Portable External Hard Drive - USB 3.0 - WDBYFT0040BBK-WESN
If budget is not an issue, a NAS storage system can also be used. In this case, your external storage option can last for years and can store huge amount of data.
#6 Use CompactOS Option for Small Capacity Hard Drives
Windows 10 has a feature called CompactOS which compresses the system files freeing up a lot of disk space. Under normal circumstances, this mode is automatically turned on or off by the operating system itself.Generally, Windows enables CompactOS mode on low capacity disks and that too when it assesses the need of the same. Although it saves a lot of disk space, the performance is affected a bit because system files are decompressed before use.

If your low capacity disk is almost packed, you can consider this option to free up some disk space. To get started, press Windows + X key and select Command Prompt (Admin) to open a DOS prompt window.
First, you need to determine whether the CompactOS mode is already in an active state or not. To do so, fire a query command as shown below.
Compact.exe /CompactOS:queryUse the same command with the always switch parameter (as shown below) to turn on the CompactOS mode on a permanent basis.
Compact.exe /CompactOS:alwaysAs I mentioned before, activating this option affects the performance especially on older systems. If you're ok with it, go ahead and activate this feature.

Compact.exe /CompactOS:neverUse the never switch parameter (shown above) to permanently disable the CompactOS mode.
If you're running a newer PC with a high capacity hard drive, I'll strongly advise against activating this feature. Let Windows decide what is best for your system.
#7 Configure Automatic Deletion of Browser Data on Program Termination
Another issue that consumes a lot of disk space is the offline data web browsers store on a daily basis. If you're a heavy Internet user and never care to delete this offline data, sooner or later, a mountain of these unnecessary files will pile up on your hard drive.The remedy to this problem is to either delete this data manually or purging it through a 3rd party system cleaning tool.
But, the best solution is to automate this process. Fortunately, all the modern web browsers provide an option to automatically purge these unnecessary files on exit. Let's see how to configure this option on Firefox and Google Chrome.
 If you're a Firefox user, go to Options → Privacy & Security → History option. Here, select Use custom settings for history option from the drop-down menu.
Now, select the Clear history when Firefox closes checkbox and click the Settings... button. You'll get a new dialog window where you can check all the data deletion options as shown in the image above.
Make sure the login and cookie options are not selected. It'll ensure you don't have to re-enter login credentials again and again on a daily basis.
 To clear the unnecessary offline data, Google Chrome users should go to Settings → Privacy & Security → Content Settings → Cookies option.
Here, activate (see image above) the Keep local data only until you quit your browser option.
Now, whenever you'll finish the browsing session and will close the browser, all the unnecessary offline data will be deleted automatically. Remember, if you're using a shared home computer, select the login and cookie options too else one of your family members may access your accounts, behind your back.
#8 Disable Hibernation Mode
Another Windows feature that consumes a good amount of disk space is the hibernation mode. If, in an active state, it saves the entire computer session in thehiberfil.sys file whenever the PC goes in sleep mode.On a typical Windows PC, this file size goes up to several gigabytes. If you rarely put your computer in a sleep mode, disable the hibernation feature permanently to reclaim the huge disk space occupied by the
hiberfil.sys file.There are two easy ways to disable the hibernation mode.
 To use the first method, press Windows + X key and click the Command Prompt (Admin) option to open a DOS prompt with administrator privileges.
Thereafter, use the following command to switch off hibernation feature, permanently.
powercfg.exe /hibernate offhiberfil.sys file.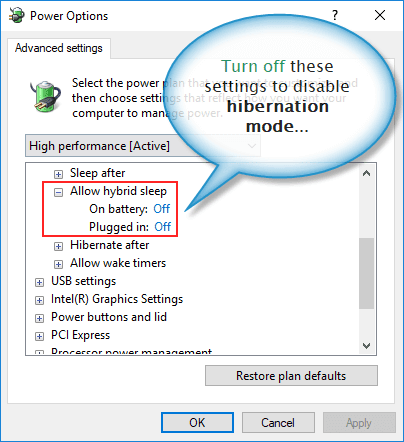 Another easy way to disable hibernation is through the GUI mode. On a Windows 10 computer, press Windows + S key and type Control in the search box. Select the Control Panel application from the menu.
Now, go to Power Options → Change plan settings → Change advanced power settings option to open the settings window.
Expand the Sleep → Allow hybrid sleep option (see image above) and turn off all the sub-options. On a desktop, you may find different sub-options which should be turned off without any hesitation.
#9 Manually Empty Recycle Bin at Regular Intervals
On Windows, all the deleted files are not purged from the disk in one go. Instead, they're sent to the recycle bin. The question arises that why the files are not deleted permanently at the first step?Well, if the file is deleted accidentally or inadvertently, it can be easily recovered back from the recycle bin. All the deleted files residing in the recycle bin takes up disk space.
If the recycle bin is not emptied for a long time, the deleted data inside it can gobble up a significant amount of disk space. The solution to this problem is quite simple.
 All you need to do is to empty the recycle bin at regular intervals. Depending on how quickly recycle bin swells on your PC decides the interval of cleaning exercise.
Here's how to empty the recycle bin. There are two different ways to do it.
If the recycle bin icon is already on your PC's desktop, right-click on it (see image above) and click the Empty Recycle Bin option from the context menu.
In case, the recycle bin icon is not present on the desktop, press Windows + X key and select the Command Prompt (Admin) option. Type the following command and press the enter key to open the recycle bin.
start shell:RecycleBinFolder#10 Manually Defragment Hard Drive at Regular Intervals
Normally, file chunks are saved at random locations on the disk which not only consumes extra space but also fragments the data. To recover the extra disk space consumed due to fragmentation, the simple and effective strategy is to defragment the hard drive.On Windows 10, the disk defragmentation process is done on an automated basis without any user intervention. On older Windows versions, this exercise needs to be done on a manual basis.
 To defrag your system drive, use Windows + S key and type Defrag in the search box. Select the Defragment and Optimize Drives option from the menu.
Thereafter, you can select the drive you want to defrag and can use the Analyze and Optimize buttons (see image above) to start the defragmentation process.
Depending on the size of the fragmented data, it can take some time before the process will be completed. On an average, one should defrag the system drive every second or third month.
#11 Find and Delete Duplicate Files
And last but not the least is the issue of user-generated or application-generated duplicate files that can occupy your precious hard drive space.A manual search of these duplicate files can be an extremely cumbersome and exhausting process. To ease the search and delete operation for these duplicate files, a 3rd party tool like CCleaner can be used.
 To get started, open the CCleaner application and go to Tools → Duplicate Finder option. Here, you can select the drives to look for duplicate files and can configure various other search options as shown in the image above.
Thereafter, you can click the Search button to start the scanning process. Once you get the list of all the duplicate files, select the ones you want to purge and click the Delete Selected button.
