

Android is a stable, mature, and feature-packed mobile operating system. Most users tend to use it with its default settings following the common usage patterns. But, there are several ways to enhance and optimize the entire experience of using an Android smartphone. And, that's what we're going to learn in this tutorial. Almost all of the fine-tuning methods presented below are more or less applicable to any smartphone powered by Android. After applying these tips and tricks, you'll be more productive and the usage will be much smoother as well as quicker. Without wasting any time, let's move ahead.

One doesn't need to be technically sound to improve and optimize their Android experience. Even a layman can do it—easily. All you need is a bit of awareness and knowledge to do so.
In case, you're skeptical about applying the techniques mentioned below, feel free to take a backup of your phone. So, take out your phone and master these techniques to get a better Android experience.
1. Learn Gesture Navigation
Gestures are one of the best ways to quickly perform various actions and navigate on an Android smartphone. These gestures may involve the use of one finger, two fingers, or three fingers.
On my phone, the settings related to gesture customization are available through the Settings → Convenience tools → Gestures & motions option. On your device, you may look for the Gestures option within phone settings.
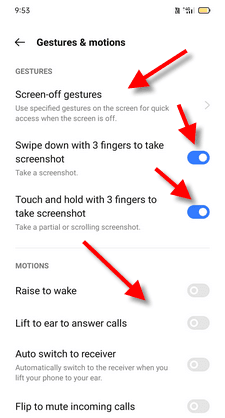
In my case, I've activated gesture settings to quickly capture screenshots on my Android phone. These gesture shortcuts speed up the actions that may otherwise take more than one click to get the job done.
You can explore the gesture customization settings on your device and can activate, customize, or deactivate the available options as per your needs.
2. Activate Developer Options
If you're a savvy user who's not afraid to go a bit technical, enabling developer options on an Android phone can open new opportunities to harness the power of this popular mobile operating system.
To activate it, the most common path is Settings → About phone → Build number option. On your device, the path may be different, but in the end, you have to reach the Build number option.
Tap Build number 7 times to activate developer options.
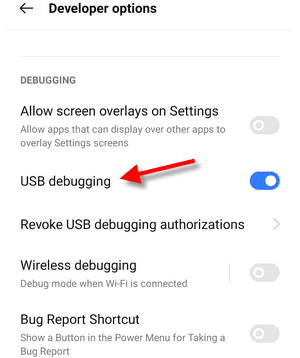
The most common option generally used by both common users and developers is USB debugging which enables you to connect your smartphone to other devices. Generally, it is used to facilitate data or file transfer through a wired connection.
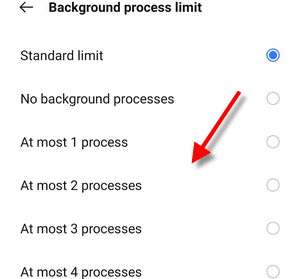
Another important setting you may want to use is the Background process limit which can help you in speeding up the app you're currently working in.
If you select the No background processes option, all of your phone resources will be used for the current app you're working in thus significantly improving its performance.
3. Use Split Screen to Multitask
Android's split screen feature allows you to view and use two apps simultaneously on the same screen. This feature is particularly useful on larger devices, such as tablets or smartphones with larger screens, as it can help you multitask and be more productive.
To use Android's split screen feature, you first need to make sure that it is enabled on your device. This can be done by going to the Settings app, selecting the Display or Multitasking option (depending on your device), and then enabling the Split screen option.
Once split screen is enabled, you can use it by following these steps:
- Open the first app that you want to use in split-screen mode.
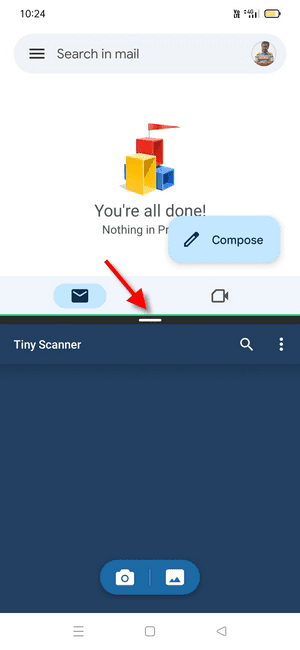
- Swipe up from the bottom of the screen to access the app switcher. This will show you all of the apps that are currently open on your device.
- Find the second app that you want to use in split screen mode, and tap and hold on to its icon.
- Drag the second app's icon to the top or bottom of the screen (depending on which orientation you want for the split screen), and release your finger.
- The two apps will now be displayed side by side on the same screen. You can adjust the size of each app by dragging the divider line between them.
- To exit split screen mode, drag the divider line all the way to the top or bottom of the screen, or tap the Home or Back button.
Some things to keep in mind when using Android's split screen feature include:
- Not all apps are compatible with split-screen mode. Some apps may not work properly or may not be available to use in split screen mode.
- Split screen mode can be particularly useful for tasks such as copying and pasting information between apps, or taking notes while reading a document or website.
Some devices may have different options or settings for split-screen mode, so you may need to consult your device's user manual or online help resources for more information.
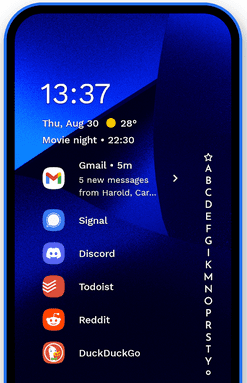
4. Try 3rd-Party Launchers
Third-party launchers are Android applications that replace the default launcher that comes with the operating system. These launchers can improve the Android experience in a number of ways, including:
- Customization - Third-party launchers provide a high degree of customization, allowing users to change the look and feel of their home screen, app drawer, icons, and other UI elements. This can help users create a more personalized experience that suits their individual preferences.
- Performance - Some third-party launchers are designed to be more lightweight and optimized for better performance than the default launcher. This can lead to faster app launches, smoother animations, and improved overall system performance.
- Features - Third-party launchers often come with additional features that are not available on the default launcher, such as gesture controls, customizable shortcuts, and advanced theming options. These features can enhance the overall user experience and make using the device more efficient.
- Better organization - Third-party launchers can offer improved organization of apps, widgets, and shortcuts. Users can create custom folders, categorize apps, and have easy access to their most frequently used apps.
- Accessibility - Some third-party launchers have been specifically designed to improve accessibility for users with disabilities. These launchers can offer larger icons, voice commands, and other features that can make it easier for users with disabilities to use their devices.
Overall, third-party launchers can greatly improve the Android experience by providing a greater degree of customization, improved performance, and additional features that are not available on the default launcher. One of the popular solutions is Nova Launcher, which I use on my phone.
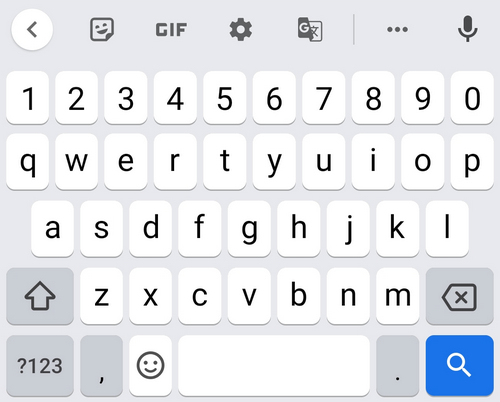
5. Take Advantage of Gboard Shortcuts
Gboard is Google's default keyboard app for Android devices, and it offers a variety of useful shortcuts to help you type faster and more efficiently. Here are some of the most commonly used Gboard shortcuts for Android:
- Swipe to type: Gboard allows you to swipe from one letter to another to form words quickly. This feature is turned on by default, and you can use it by swiping your finger across the keyboard.
- Voice input: To use voice input on Gboard, tap the microphone icon on the keyboard and speak your text. This is a great option for times when you don't want to type, or when you need to be hands-free.
- Emojis: To access emojis on Gboard, tap the smiley face icon on the keyboard. From there, you can browse through a wide variety of emojis and select the one you want to use.
- GIFs: To add a GIF to your message, tap the GIF icon on the keyboard. You can then search for a GIF by keyword, or browse through popular categories.
- Clipboard: Gboard has a clipboard feature that allows you to copy and paste multiple items at once. To access your clipboard, press and hold the comma key on the keyboard.
- Text editing: Gboard offers a number of text editing shortcuts to help you make quick changes to your text. For example, you can press and hold the delete key to delete text more quickly, or press and hold the period key to access special characters.
- One-handed mode: Gboard offers a one-handed mode that makes it easier to type with just one hand. To activate the one-handed mode, tap and hold the comma key, then select the icon that looks like a hand.
- Keyboard settings: To access the settings for Gboard, press and hold the comma key, then select the gear icon. From there, you can customize various settings for the keyboard, including auto-correction, predictive text, and more.
Overall, Gboard offers a wide variety of shortcuts and features that can help you type faster and more efficiently on your Android device. By taking advantage of these shortcuts, you can save time and improve your overall typing experience.
6. Use Automation Tools
There are many automation tools and apps available for Android that can help you automate various tasks and improve your productivity. I've created a list of these automation tools.
To use these automation tools and apps, you will need to download them from the Google Play Store and then follow the instructions to set up your automation. Each app has its own interface and features.
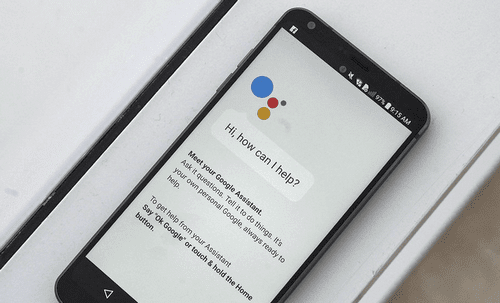
7. Make Google Assistant—Your Friend!
Google Assistant is a powerful tool that can help you be more productive on your Android device. Here are some tips on how to use Google Assistant to increase your productivity:
- Use voice commands to perform tasks: Google Assistant allows you to perform various tasks on your device using voice commands. For example, you can ask it to send a message, set a reminder, play music, or make a phone call. This can save you time and help you be more efficient.
- Create custom routines: Google Assistant allows you to create custom routines that can perform multiple tasks with a single voice command. For example, you could create a "morning routine" that sets the alarm, reads the news and provides the weather forecast.
- Set reminders: Google Assistant can help you remember important tasks and events by setting reminders for you. You can ask it to remind you to do something at a specific time or when you arrive at a certain location.
- Manage your calendar: You can use Google Assistant to manage your calendar and schedule appointments. You can ask it to add events, check your schedule, or set reminders for upcoming meetings.
- Use it for navigation: Google Assistant can help you navigate to a destination by providing directions and real-time traffic updates. You can ask it to give you directions to a specific location or to find nearby restaurants or businesses.
- Control your smart home devices: If you have smart home devices, you can use Google Assistant to control them with voice commands. For example, you could ask it to turn off the lights or adjust the thermostat.
To use Google Assistant, you can activate it by saying "OK Google" or "Hey Google", or by pressing and holding the home button on your Android device. You can then speak your command or question, and Google Assistant will respond with the appropriate action or information.
