
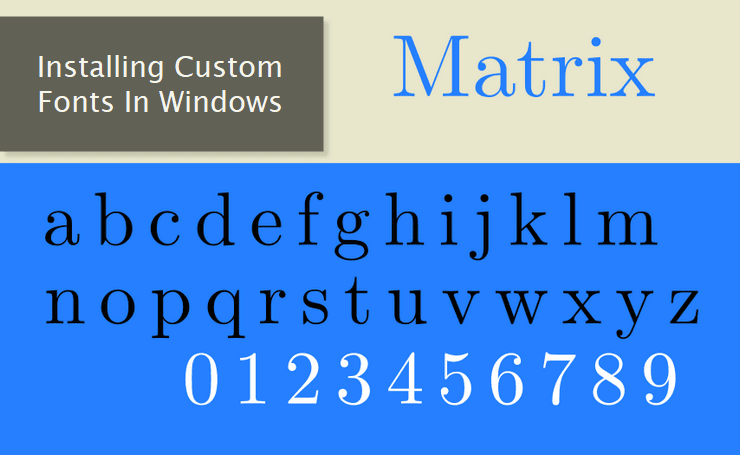
Whether it's a print or a digital world, fonts are an important part when it comes to presenting content in front of viewers or readers. Windows OS comes with a set of default fonts which is more than enough for an average user. However, graphic designers, web developers, and writers often need custom fonts in their applications. In this guide, we'll learn about installing these custom fonts on a Windows PC. Broadly, fonts are either free or paid. The installation of both types is the same. Although installing and using custom fonts is easy, there are some cons associated with it. We'll discuss that too in this post.
If you're using an older version of Windows, there can be a slight difference in the installation process and you may get confused. I'm demonstrating this installation process on a Windows 10 machine.
While installing custom fonts, make sure you're logged in as an administrator. Although not mandatory, I'll advise closing any word-processing application before installing a custom font. Let's get started!
Select and Download Custom Fonts
The first obvious step involves the selection of custom fonts. There are dozens of good websites where you can find both free and premium fonts. The most popular free fonts destination is Google Fonts.
And, if you are looking for premium fonts, use Adobe Fonts as your go-to destination.
Font files are generally available in either .ttf or .otf formats. Select the file you need and download it on your computer to kickstart the installation process.
To better handle your collection of custom fonts, make a separate folder. You can categorize your custom fonts in subfolders based on different criteria. This way you'll be in a better position to access, manage, and organize these fonts.
Installing Custom Fonts: Method 1
There are two methods to install custom fonts on a Windows machine. Let's take a look at the first method. First of all, we need to access the font settings.
For that, go to the Start Menu → Settings → Personalization → Fonts option.
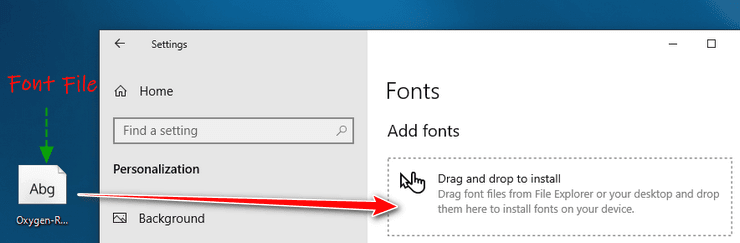
Here you can see (see image above) a dotted box where you can drag and drop the font files downloaded earlier on your PC. In the example shown above, you can see a font file on the desktop.
Once you've dropped the font file in that box, Windows will automatically install it on your system. Thereafter, you can use the installed font in different types of applications, as and when needed.
Installing Custom Fonts: Method 2
The second method of installing custom fonts is dead simple. This method gives you two options when initializing the installation process.
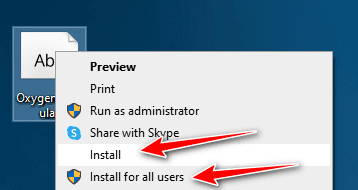
As you can see in the image above, the font can be installed either for all the user accounts on the Windows system or only for the currently logged-in account.
Quite similar to method one, once you trigger the installation process, nothing else needs to be done from your end. The Windows system installs it automatically without any user intervention.
Using Custom Fonts in Applications
Now that your custom font has been installed, using it in an application is easy. Let's take the example of Microsoft Word which is one of the most common applications Windows users use on their PC.
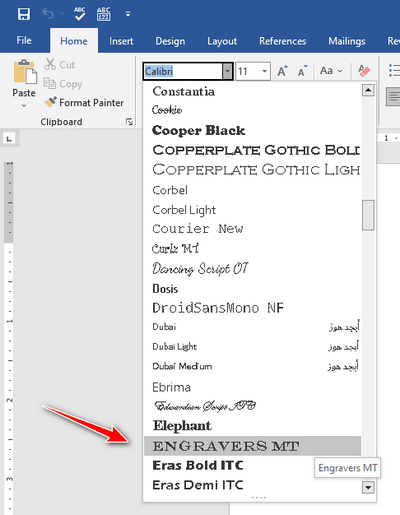
As you can see in the image above, using a custom font in Microsoft Word is dead simple. Simply, click the dropdown menu and select the one you need for your document.
All of the Windows applications providing custom font support have such dropdowns for font selection.
Dos and Don'ts When Using Custom Fonts
Everything you do has some pros and cons. There are things you should do and not do when performing a task. In this context, let's see the dos and don'ts when dealing with custom fonts.
- Avoid installing too many custom fonts on your Windows machine. It can slow down your PC—especially—if you're using an old hardware configuration with a limited amount of RAM.
- Custom fonts come in several variants viz., regular, italic, and bold. Make sure you only download and install the variants you intend to use in your applications.
- Lastly, if you're sharing documents consisting of custom fonts, do attach the custom font files along with the document. It'll ensure the person at the other end can view the document in its original format.
So, that's it! Custom fonts are a great way to pep up your text. It makes the copy pleasing to the eyes and attracts the attention of the reader.
