
Start with Taking a Backup of the Design Template
Always make it a practice to backup your Blogger design template before integrating such type of customizations. It ensures that if things go wrong, you can easily reapply the old design template.For such type of code customization, taking the content backup is not necessary as it is not directly related to the design template.
 To backup your blog's template, open the dashboard and go to Theme → Backup / Restore option. Use the Download theme button to save a copy of the same.
As mentioned in the image above, just saving the copy on the desktop is not enough. Save it to one of your preferred cloud storage platforms for a complete peace of mind.
Deactivate and Remove Native or Existing Disqus Comment System
After taking the template backup, it's time to remove the currently active comment system on the blog. Removal of an active comment system is obviously necessary so that our lazy loading comment system can take its place.There are 3 different scenarios when it comes to deleting an existing comment system from a Blogger blog. A Blogger blog can have Google+ comment system, native Blogger comment system, or a 3rd party comment system like Disqus in an active state.
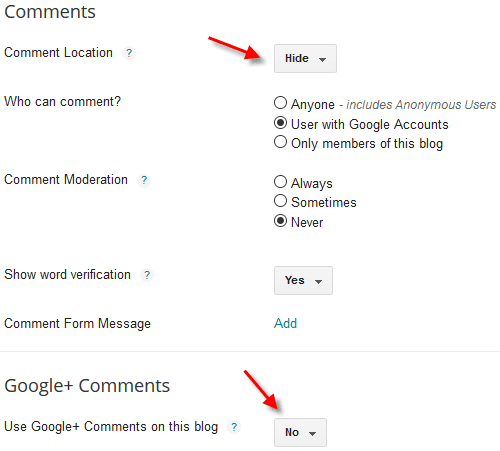 If your blog is using Google+ comments or the native Blogger comment system, go to Settings → Posts, comments and sharing → Comments section.
Here, select Hide for the Comment Location sub-option. And, within the Google+ Comments section, select No for the Use Google+ Comments on this blog sub-option.
These settings ensure that both these comment systems are deactivated and removed from the blog.
 If you're using Disqus comment system on your blog, go to the Layout option and click the Edit link for the Disqus widget. Thereafter, click the Remove button to delete the Disqus system from the blog.
After deletion, clear your web browser's cache and once reload your blog to ensure the existing comment system is indeed gone. You may notice a faster page load time after completing this step.
Integrate Lazy-Loading Disqus System Within the Template
And now, it's time to do the real work. We've already taken the backup of the template in the very first step so we can directly start the template editing process to install the lazy-loading Disqus comment system.To do so, go to Theme → Edit HTML option and open the design template source code. Within the template's
<head> tag, find the closing </style> tag and right before this tag, paste the following CSS code..disqus-loading {
border: 2px solid #8d8888;
text-align: center;
background-color: #e1e1e1;
font-size: 18px;
font-weight: 300;
color: #777;
padding: 12px 0;
}
.disqus-loading.is-hidden {
display: none;
}Next, find the following HTML code snippet within the template.
<div class='post-footer-line post-footer-line-3'>if conditional statement.<b:if cond='data:blog.pageType == "item"'>
<div class='disqus-loading'>Loading comments&hellip;</div>
<div class='disqus'/>
<!-- Paste JavaScript code given below - here! -->
</b:if><script>
/*<![CDATA[*/
!function(t,e,n){"use strict";var o=function(t,e){var n,o;return function(){var i=this,r=arguments,d=+new Date;n&&d<n+t?(clearTimeout(o),o=setTimeout(function(){n=d,e.apply(i,r)},t)):(n=d,e.apply(i,r))}},i=!1,r=!1,d=!1,s=!1,a="unloaded",u=!1,l=function(){if(!u||!e.body.contains(u)||"loaded"==u.disqusLoaderStatus)return!0;var n,o,i=t.pageYOffset,l=(n=u,o=n.getBoundingClientRect(),{top:o.top+e.body.scrollTop,left:o.left+e.body.scrollLeft}).top;if(l-i>t.innerHeight*r||i-l-u.offsetHeight-t.innerHeight*r>0)return!0;var c,f,p,y=e.getElementById("disqus_thread");y&&y.removeAttribute("id"),u.setAttribute("id","disqus_thread"),u.disqusLoaderStatus="loaded","loaded"==a?DISQUS.reset({reload:!0,config:d}):(t.disqus_config=d,"unloaded"==a&&(a="loading",c=s,f=function(){a="loaded"},(p=e.createElement("script")).src=c,p.async=!0,p.setAttribute("data-timestamp",+new Date),p.addEventListener("load",function(){"function"==typeof f&&f()}),(e.head||e.body).appendChild(p)))};t.addEventListener("scroll",o(i,l)),t.addEventListener("resize",o(i,l)),t.disqusLoader=function(t,n){n=function(t,e){var n,o={};for(n in t)Object.prototype.hasOwnProperty.call(t,n)&&(o[n]=t[n]);for(n in e)Object.prototype.hasOwnProperty.call(e,n)&&(o[n]=e[n]);return o}({laziness:1,throttle:250,scriptUrl:!1,disqusConfig:!1},n),r=n.laziness+1,i=n.throttle,d=n.disqusConfig,s=!1===s?n.scriptUrl:s,(u="string"==typeof t?e.querySelector(t):"number"==typeof t.length?t[0]:t).disqusLoaderStatus="unloaded",l()}}(window,document);
/*]]>*/
</script>
<script>
disqusLoader( '.disqus',
{
scriptUrl: '//username.disqus.com/embed.js',
disqusConfig: function()
{
this.page.identifier = '<data:post.id/>';
this.page.url = '<data:blog.canonicalUrl/>';
this.page.title = '<data:post.title/>';
this.callbacks.onReady = [function()
{
var el = document.querySelector( '.disqus-loading' );
if( el.classList )
el.classList.add( 'is-hidden' ); // IE 10+
else
el.className += ' ' + 'is-hidden'; // IE 8-9
}];
}
});
</script>username with your actual Disqus account username. Failing to do so will make the code useless so make sure this important step is not skipped at all.Now save the template and clear the browser's cache. Thereafter, open any blog post to see if everything is working correctly or not. Scroll down to reach the end of the post and you'll see the Disqus comment section loading process happening that very moment.
After opening the first blog post, if a visitor opens more posts, the comment thread data for that very post is fetched as soon as he scrolls down the page.
This process leaves a very light footprint because much of the Disqus data is already present in the cached form. Remember, this optimized lazy-loading comment system will only work on single post pages. It'll not appear on static pages.
