
Remote teaching is one of the viable options to earn from home. If you're good at something, remote teaching is your best bet to spread your knowledge and earn at the same time. But, without any prior experience in the same, it's very difficult to get started. Fortunately, there are several specialized applications built specifically for teachers and instructors to launch their own remote teaching setup. Some of these solutions are difficult to configure while others are dead simple. In this guide, we'll take a look at Google Classroom and will see how it can help you get started with remote teaching.

All you need is a fast internet connection with good audio and video recording facilities. The latter one is required if you're providing video content in your courses. Text-based courses are also a popular option.
Once you get familiar with Google Classroom's setup, you can create new classes and courses in no time without any hassle. So, without any delay, let's dive into remote teaching through Google Classroom.
Note: This is not a premium course selling service. All it offers is a way to teach and grade your students—remotely—based on the study material you provide to them.
So, let's get started!
The very first obvious step is to first open the Google Classroom dashboard. Make sure you're logged in with your preferred Google account credentials.
Start with clicking the Create class option and providing the necessary details for your new class.
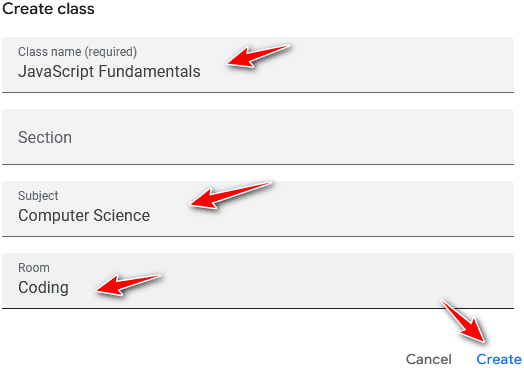
The class name is mandatory. Pick a relevant name and provide additional information if you want to do so. I'll recommend providing the subject name and the room in which the students will go to access the course material.
Note: The course material uploaded for classes takes up space in your account's Google Drive storage. Upon deleting the class, delete the course material from Google Drive as well.
The next optional step is to customize the theme of your class. If you want you can skip this step.

Click the Customize option and upload your custom header image and the theme's accent color you want to use. Choose the image carefully that relates to the topic of your class.
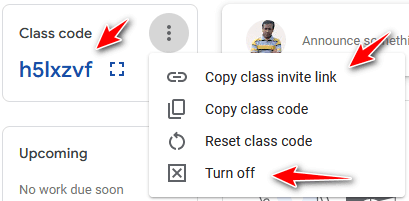
Each class has a unique code you can use to send invite links to the students. Or, you can turn it off and later send automated invite emails to students, whenever required. I prefer the latter approach.

Click the Stream settings option to customize how students interact with you during their course progression. I prefer to keep the student commenting option—open. If you want them to upload assignments as well, choose the appropriate option.
The notification format for the uploaded course material can be customized. Feel free to experiment and choose the one you prefer. You can also take feedback about its preference from your students.
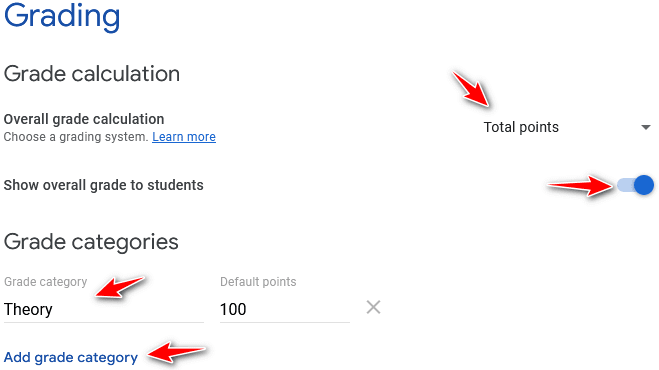
If you're going to grade your pupils, choose a grading system for your course. The best one and the easiest to understand is the point-based system. In case, you're not going to grade, simply keep the grading system turned off.
Depending on your requirements, give an appropriate name to the grading categories and the maximum points for each one of them.
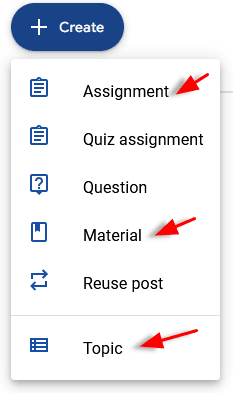
Now that the class has been created and its basic settings have been configured, it's time to create the learning material for the class. Switch to the Classwork tab and click the Create button to get started.
Here, the three most important options used most frequently by instructors and teachers are Topic, Material, and Assignment.
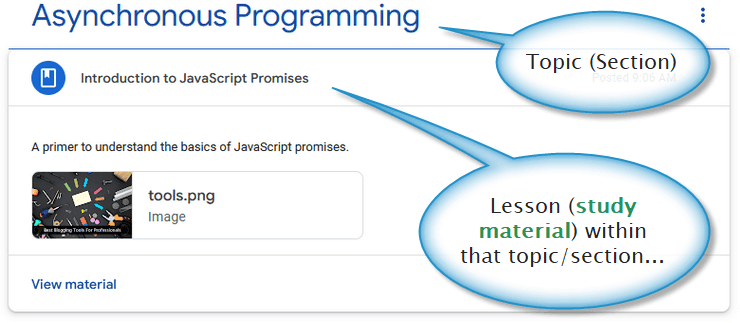
You can think of topics as the lesson names of your course. Whatever study material or assignments you create for the students, you can assign or attach them with appropriate topics to group together similar or relevant content.
Tip: Creating topics is not mandatory, but creating them helps you segregate your study material in a better and more logical way.
The Material is one of the most used options. Through it, you can upload literally any type of study material in digital form. Following are some of the types of content you can upload for your students.
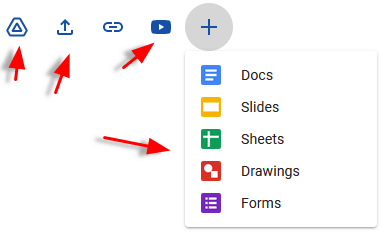
- Google Drive files.
- Files from your computer.
- Links.
- YouTube Videos.
- Google Docs file. (e.g Docs, sheets, drawings, forms, slides)
This literally covers almost everything. It's not just YouTube videos, you can directly upload recorded videos as study material. All this uploaded stuff is stored in your Google Drive storage.
Assignment, Quiz assignment, and Question are three types of study material against which you can grade the students. Feel free to use any of them as per your requirements.
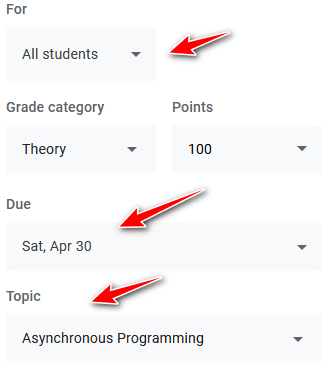
You can not only specify the due date for the assignments and questions but can also schedule them to be automatically published at a specific date and time.

Once, you've created and uploaded the course material, students can be invited to access your course. To do so, go to the People tab and click the Invite Students icon.
Type in the email address of the students you want to invite. If a Gmail contact is not in your contact list, it'll be added to the same. An email will be sent to the student consisting of an invite link.
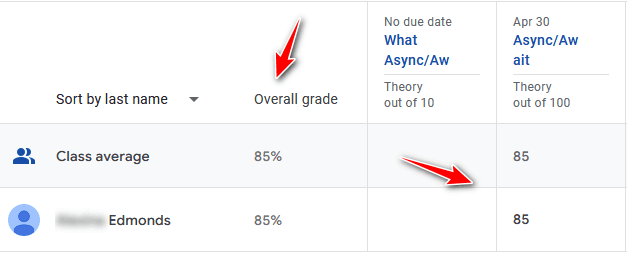
The Grades tab is where you can see and manage the grades of all the students. They're displayed in a nice tabular format for each of the students. You can edit, delete, or delete all the uploaded assignments right from within this table.
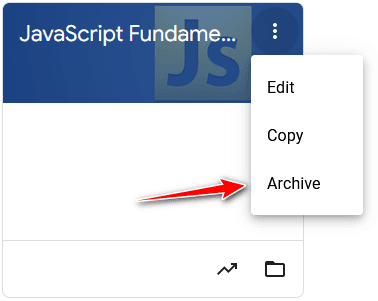
If you want to permanently delete a class, first you have to archive it. To do so, choose the Archive option from the dropdown menu as shown above.
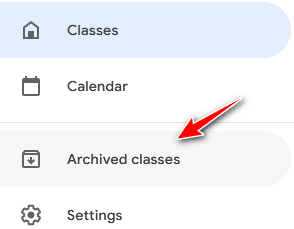
Once a class has been archived, you can view it by choosing the Archived classes option from the menu. All the archived classes can be deleted or restored if required.
And lastly, make sure you delete the class folder from Google Drive as well. Failing to do so will unnecessarily occupy the storage space of your Google account.
So, what are you waiting for? Go ahead and create courses and classes for free and teach your students online—without spending a dime.
